welcome! I’m so glad you decided to learn crochet! This is a super easy and fun craft because once you get the hang of it, you can make almost anything. All you have to do is get used to holding your needle and yarn, tie a slipknot, hook a chain, and you’re ready to go! You will also learn how to crochet a basic type of crochet, the single crochet.
When starting my crochet journey, I watched a lot of videos and tutorials on YouTube to make sure I was doing it right. I’m a perfectionist and I want my projects to look exactly like the photos and videos. However, practice makes perfect! You’ll want to do some pattern squares at the beginning to get a feel for how you’re holding the needle and yarn, and to make sure you know how tight you are. Don’t worry if you end up with a lot of blocks! You can connect them and end up with a blanket! How cool is that? !
In this written tutorial, I’ll show you how to hold a needle and yarn, slipknot, chain crochet, single crochet, and finish and weave ends.
What you will need to start:
I recommend that you start off with a thicker yarn and the hook recommend by the yarn label.
That said, how do you know what to look for when you go yarn shopping? On the yarn label you will see the number showing what size your yarn is, it looks like this:
If you’re interested in starting a new hobby or learning a new skill, you’re in the right place! After reading this guide to crochet patterns, you’ll be able to make beautiful wearable items like scarves, hats, and blankets.
How To Crochet For Beginners
If you’ve always wanted to learn to crochet but didn’t know where to start, this guide is for you! Learn the basics of crochet with this easy-to-follow step-by-step tutorial.
What is crochet?
Crochet has been around for centuries and remains one of the most popular yarn crafts today. This is a method of making terry fabric from yarn using a crochet hook.
Learning how to crochet is not difficult, but it can be a little difficult at first. Like learning a new skill, mastering crochet requires a certain amount of perseverance and patience.
To learn to crochet, start with basic techniques and some basic stitches.
One of the great things about crocheting is that you don’t need a lot of tools to get started. In fact, you only need these two things:
- a crochet hook
- yarn
The right tools can make learning easier. Choose an easy-to-use hook and line and set yourself up for success. Here are my recommendations for the best crochet accessories for beginners.
other stocks
If you still want to grab a few more items, you can also pick them up:
- Yarn needles or a pack of blunt tapestry needles.
- stitch marks
- small sharp scissors
how to crochet step by step
Let’s start! Pack your supplies and find a well-lit, comfortable workspace.
I encourage you to read through these steps before picking up the hook. Remember, learning to crochet takes practice – so keep at it!
NOTE: This pattern uses American terminology for crochet and shows right hand instructions. Check out this handy crochet term conversion guide to learn the difference between British and American crochet terms.
Step 1: How to Hold the Crochet Hook
The first step is to learn how to hold the yarn and crochet in a way that is comfortable for you. Most people hold the hook with their dominant hand and the yarn with their non-dominant hand.
NOTE: I am right handed so the picture shows me holding the needle in my right hand and the yarn in my left. I’ll write the instructions from a right-handed person’s perspective – but left-handers can reverse the instructions to learn how to crochet left-handed.
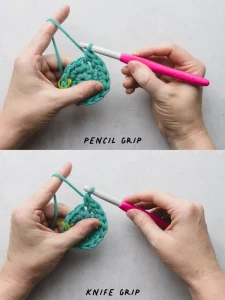
Most people hold a crochet hook in one of two ways: the pencil method or the knife method.
Pencil Grip: Hold the hook with your thumb and index finger like you would a pencil. Use your ring finger underneath for more balance and control.
Hilt: Place your hand on the hook with the palm facing down. Hold the hook with your thumb and index finger. Wrap the other three fingers around the shank of the hook for more control.
Personally, I prefer to hold the hook with the handle of the knife. Experiment with both options to see which feels most natural to you.
How to Hold Crochet Yarn
To hold the yarn, thread the yarn through the fingers of your non-dominant hand. Wrap the yarn under the pinky, ring, and middle fingers, and over the index finger. To create more tension in the yarn, you can wrap the yarn once around your pinky finger, then pass it under your ring and middle fingers and over your index finger.
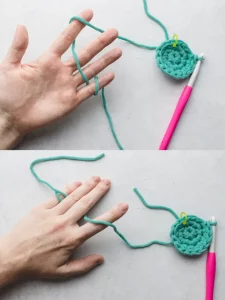
Holding the yarn in this way may be uncomfortable at first, but keep practicing. Over time, you’ll discover your favorite way to hold the yarn and maintain tension.
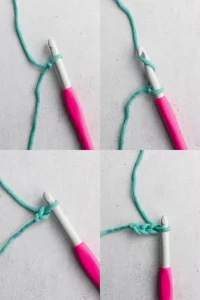
Step 2: How to Tie a Slip Knot
Pull a piece of yarn from the ball. Begin looping about 6 inches from the end of the yarn, leaving a tail to braid later.
Lay the ball end of the yarn around in a clockwise direction and place it on top of the tail end.
Insert the hook into the center of the loop from front to back. Grab the ball end yarn with the hook and pull it through the center of the loop.
Pull the ends of the twine to tighten the loop around the hook.
The slipknot is ready and you can start crocheting.
Step 3: How to Yarn Over
Yarn Over, abbreviated YO, is a basic crochet technique that you’ll use to make all basic crochet stitches. For example, you can use the yarn to make a starting chain stitch in the next step, and then crochet a single crochet stitch.
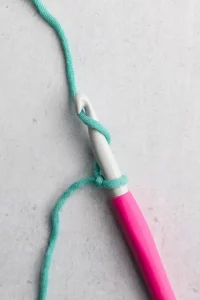
Here’s how to yarn over:
Wrap the yarn around the crochet hook with your left index finger, or swing the hook under the yarn with your right hand. These two actions do the same thing.
Once you’ve practiced the YO movement yourself, you can use it as part of basic crochet. let’s continue.
Step 4: How to Make a Starting Chain
The next step is to create a starting chain. A starting chain stitch is a number of crochet chain stitches that form the basis for the rest of your crochet project.
To create a startup chain:
Hold the needle in the right hand and the yarn in the left. Put the hook into the slipknot (if you haven’t already).
Hold the end of the slipknot with the thumb and middle finger of your left hand.
Thread the working thread through the needle (aka “yoke”) from back to front.
Turn the hook slightly to catch the yarn in the bowl (or mouth) of the hook. Thread the hook through the loop on the hook. The air stitch is ready.